Sunday, March 2, 2014
No progress due to extreme temperatures
Thanks for checking in! Unfortunately, we have not been working on the house due to the extreme cold. Hopefully in another two weeks we can resume work!

Sunday, October 27, 2013
New Windows and New Subfloor
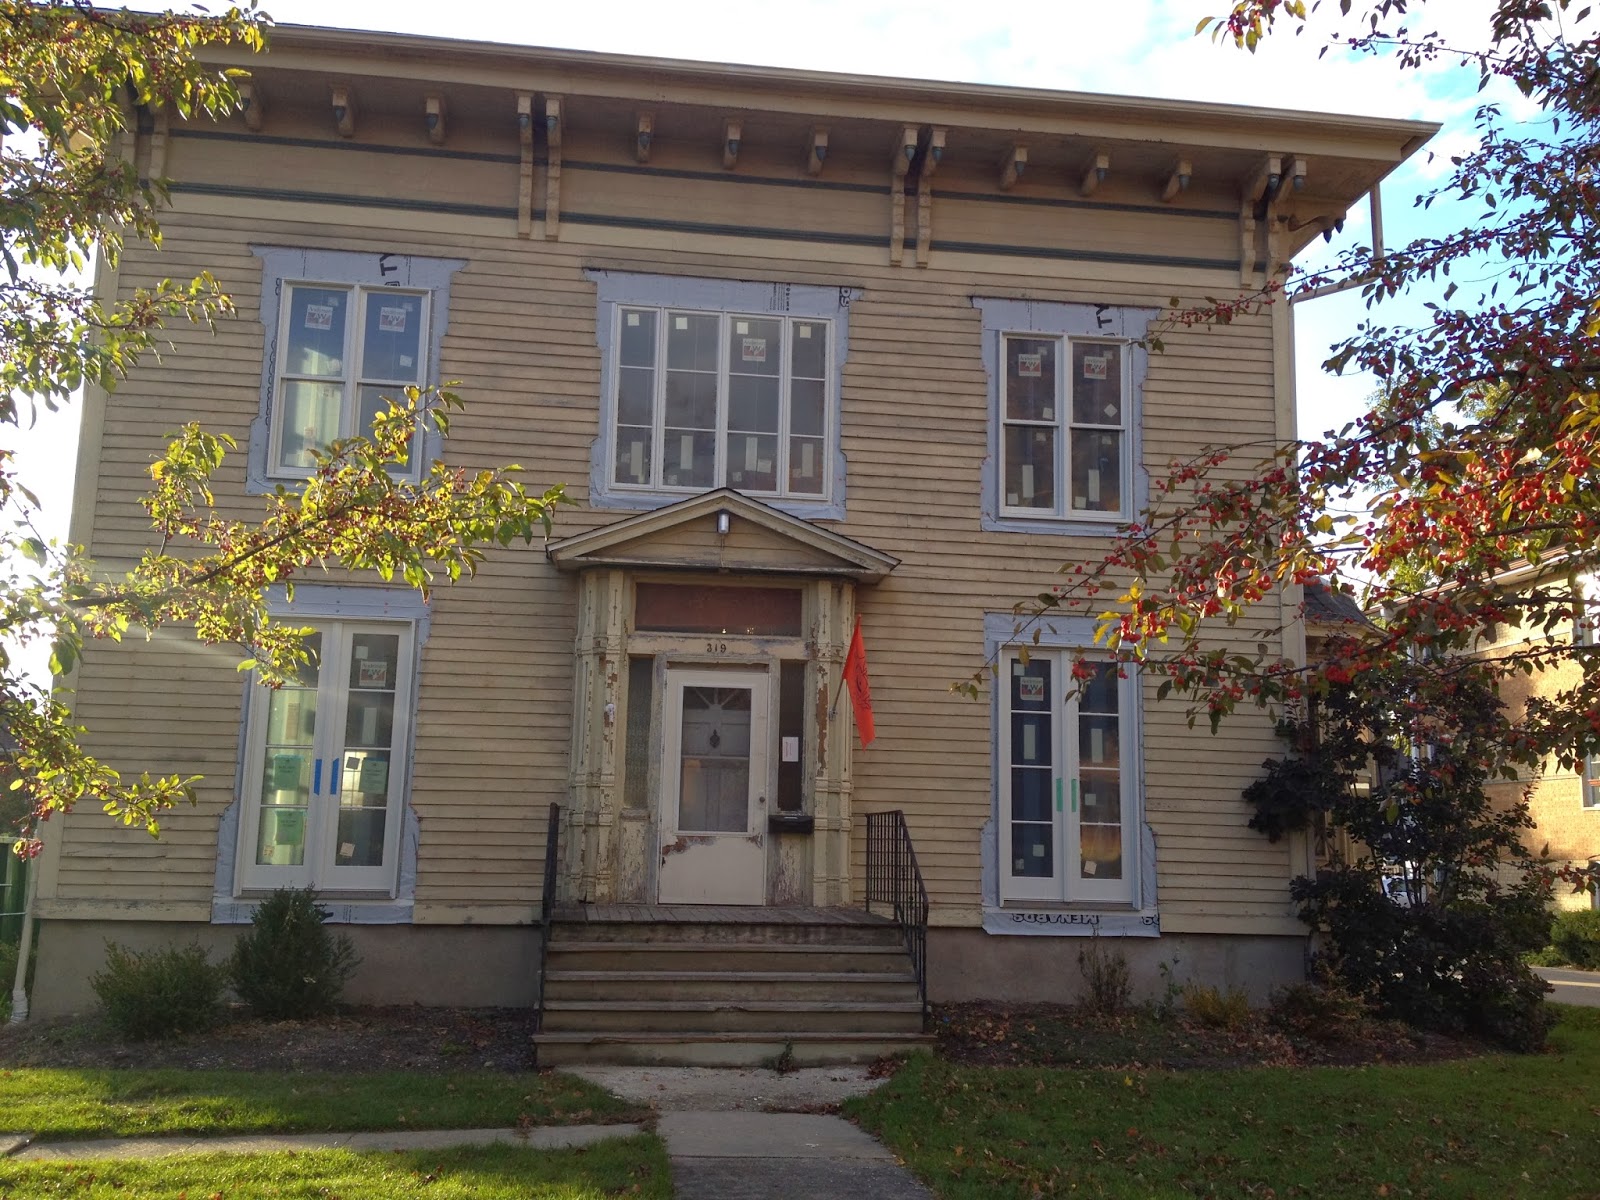
I am happy to report we have new windows! We made the choice to replace all 30 windows (uggg!) with energy-efficient replicas.
 |
| Front Double Doors - South |
The stain glass, which was originally on the top half of this window, will be reinstalled after it is repaired.
 |
| Original Bedroom Window |
 |
| New Kitchen Window |
 |
| Upstairs Landing |
There was a couple of exceptions. We did opt to replace two of the back first floor windows with a patio door.
 |
| Back French Doors |
 |
| New Windows - Back |
 |
| South Subfloor - minus attic stairs (looking West) |
 |
| North Subfloor (looking east) |
 |
| Attic Subfloor |
Sunday, September 29, 2013
New Roof and New Inspiration
 |
| New roof being installed |
Thanks to Tip Top Roofing we have a new waterproof roof! We went with the architectural style shingles in Colonial Gray. Giovanni and the rest of the crew did a great job.
 |
| Flat roof on north side being replaced |
We also installed four skylights in the attic. We really want the attic to be a nice "play room" for both Oraya and Brad, so the extra natural light helps. We understand that skylights are NOT period appropriate for our home. In our defense, we did not put any of the east side (the front side facing the street), but kept them more hidden on the sides and the back.
More exciting news...the windows are being delivered tomorrow! Install is supposed to begin Tuesday, but that is not confirmed yet. On Saturday, to save time (which equates to $$$), we took the trim off and the storm windows and frames out. I should note that we are replacing all of the windows with energy-efficient replicas of the existing ones. I'm all about rehabing, repurposing, reusing, etc., but the original windows that were still in the house would cost us a bundle in heating costs. All the windows are in the garage and some will get new life in another area of the house.
All 30 (that's right, 30, which does NOT include the basement or attic windows) of our existing windows are custom sizes. Unfortunately, we just did not have that kind of money in our budget, so we went with the closest standard sizes. This means more time will need to be spent framing in these windows. Not a great situation, but the best we could do. We also opted to close up a couple of the windows that were not original to the house.
My final news of the evening is that I was reinvigorated about our project today by Nicole Curtis, star of Rehab Addict. Believe it or not, she spoke today at The Old House New House Show at Pheasant Run Resort in St. Charles. Strange, I know. Anyway, she is my reno idol! Brad is not a fan of her show, because every time I watch it, I want to save something else in our house or find some salvage something or another to put in it. I'll give you a quick example...we uncovered a "chimney" of sorts, which was obviously used for a wood burning stove and a brick fireplace. I, off course, want to save it. Brad, of course, hates it. In the intro to her show, Nicole can be heard saying, "I just want brick" as she uncovers a lost fireplace. Now you get why Brad is on the verge of banning Rehab Attic from our televisions.
I digress..I listened to Nicole speak and felt like every little architectural detail that I save, is worth it, no matter how many trips I have to make in to the garage carrying heavy stacks of old wood. How many hours I loose to striping paint off of door hardware. Or even if I almost pass out from the blinding pain in my knee after a mishap while removing nails from floorboards in the attic. Thanks Nicole!
 |
| Oraya is learning about Girl Power from Nicole Curtis of Rehab Addict |
Sunday, August 11, 2013
Progress at 319
Construction rather than destruction
I'm happy to report that we have made progress, slight though it may be. Thanks to our friends Chris, Kevin, Matt, and Kevin we now have some new walls! For those of you unfamiliar with the process (like me before we started this project) of removing an existing wall and replacing it with a new wall, first a temporary wall must be built. This wall will hold the wait of the ceiling until the new, permanent wall is installed. Below are the temporary and new permanent walls.
 |
| Temporary wall parallel to existing wall |
 |
| New Wall (thanks Chris and Kevin) |
When a new wall is built, a "header" needs to be put in any place a door will be installed. A header is basically a wood sandwich. In our case, the headers are three boards glued and screwed together. The headers caused quite a long conversation between Brad and me, since installing the headers meant we had to know where we wanted the doorways. We finally figured out where we want the mudroom, library, and bathroom doors...we think...and the headers were installed.
 |
| Library doorway header |

Wednesday, July 17, 2013
Vote for our kitchen sink
Here's another voting opportunity! Brad and I have differing opinions on our kitchen sink. Yes, that's right...we disagree on everything including the kitchen sink! I originally wanted a copper sink. Not only would it be a focal point in the kitchen, but I think it is period appropriate? Someone please correct me if I'm wrong. I haven't been able to find much information on 1860s kitchens.
I said I originally wanted a copper sink. While getting water on the counter top for the millionth time when washing dishes, I decided a drainboard sink is a better option. I also would have to sell a kidney to afford a copper sink. And since we never fill one side of the sink and rinse in the other, but I often wash extra large items, one big bowl (rather than two smaller bowls) seemed the most appropriate choice. I really do not want a white cast iron, because it is difficult to keep clean and gets black scratches every time a pan is washed.
I've learned there aren't many choices in drainboard sinks. White or some composite something-or-another. I like the first one, as I think it's the most period appropriate, but of course, Brad doesn't like it. I also like the second one, but it is crazy expensive. The third is the cheapest option, my least favorite. Brad would like ta standard stainless steel sink, which would be the cheapest option. Ahhh...what would Nicole Curtis do?
Here are the three options I found....


I said I originally wanted a copper sink. While getting water on the counter top for the millionth time when washing dishes, I decided a drainboard sink is a better option. I also would have to sell a kidney to afford a copper sink. And since we never fill one side of the sink and rinse in the other, but I often wash extra large items, one big bowl (rather than two smaller bowls) seemed the most appropriate choice. I really do not want a white cast iron, because it is difficult to keep clean and gets black scratches every time a pan is washed.
I've learned there aren't many choices in drainboard sinks. White or some composite something-or-another. I like the first one, as I think it's the most period appropriate, but of course, Brad doesn't like it. I also like the second one, but it is crazy expensive. The third is the cheapest option, my least favorite. Brad would like ta standard stainless steel sink, which would be the cheapest option. Ahhh...what would Nicole Curtis do?
Here are the three options I found....
White
Farmhouse with double drainboards
790 (sink) + 276 (faucet) + 44 (additional costs are for basin rack & drain basket) = $1110
White Apron
front with drainboard
1193 (sink) + 125 (faucet) + 276 +
44 (additional costs are for basin rack & drain basket) = 1638
Beige drop
in with drainboard
536 (sink) + 125 + 169 + 27 + 44 (additional costs are for basin rack, drain basket & soap dispenser) = 901
Sunday, July 14, 2013
Help us choose our exterior color
As some of you know, at our daughter's birthday party we asked our guests to vote for our exterior house colors. Guests were given the choice of two color schemes: many different shades of blue with yellow accents or khaki greens (one more gray and one more sage) with rust (one choice was more orange and one was more red) accents.
It was very close, but Water's Edge/yellow barely beat out Escape Gray/Flower Pot. When I was preparing a small section of the house on which to test the colors, I realized we really need a third color. So I went to our local Sherman Williams store and got some color samples. I got the Water's Edge, but also another very similar color called Meditative and the Butter Up. I picked a bold blue for the third color in this scheme. I also got Escape Gray and Flower Pot. I chose Dried Thyme as the third color in this scheme. The small containers of paint are really too big for what we needed, but thank goodness I bought them! When I tried out the paint on the house, we didn't like any of the colors!


The yellow was much more lemony than the swatch. The two blues (Water's Edge and Meditative) were okay, but in hindsight are similar to our next door neighbor's house. The accent blue was just down right ugly. The Escape Gray was not what we were hoping for...we wanted more of a khaki green. Dried Thyme was okay, but didn't thrill either of us and is probably too dark for the main color. Flower Pot was true to its swatch, but is a bit too bold for our bigger accents, like the window trim. Although, it is fine for smaller areas, like the accent trim above the window.
Below is a picture of what we aspire to with our renovation. It's unlikely we will have the time or the money to get our house to look like this, but we can dream....we even kind of like the color scheme.

So, it's back to the drawing board. I should note that, as I alluded to, our next door neighbor's house is a blue/gray color with white trim. There are quite a few historic homes on Somonauk with the khaki/burnt orange combination. Although, none have a house color of green khaki...they are all tan/beige with burnt ourange. There are also quite a few yellow houses on the street.
We're looking for suggestions please. Thanks!
It was very close, but Water's Edge/yellow barely beat out Escape Gray/Flower Pot. When I was preparing a small section of the house on which to test the colors, I realized we really need a third color. So I went to our local Sherman Williams store and got some color samples. I got the Water's Edge, but also another very similar color called Meditative and the Butter Up. I picked a bold blue for the third color in this scheme. I also got Escape Gray and Flower Pot. I chose Dried Thyme as the third color in this scheme. The small containers of paint are really too big for what we needed, but thank goodness I bought them! When I tried out the paint on the house, we didn't like any of the colors!
The yellow was much more lemony than the swatch. The two blues (Water's Edge and Meditative) were okay, but in hindsight are similar to our next door neighbor's house. The accent blue was just down right ugly. The Escape Gray was not what we were hoping for...we wanted more of a khaki green. Dried Thyme was okay, but didn't thrill either of us and is probably too dark for the main color. Flower Pot was true to its swatch, but is a bit too bold for our bigger accents, like the window trim. Although, it is fine for smaller areas, like the accent trim above the window.
Below is a picture of what we aspire to with our renovation. It's unlikely we will have the time or the money to get our house to look like this, but we can dream....we even kind of like the color scheme.
So, it's back to the drawing board. I should note that, as I alluded to, our next door neighbor's house is a blue/gray color with white trim. There are quite a few historic homes on Somonauk with the khaki/burnt orange combination. Although, none have a house color of green khaki...they are all tan/beige with burnt ourange. There are also quite a few yellow houses on the street.
We're looking for suggestions please. Thanks!
Friday, June 28, 2013
The Project Begins

On November 11, 2012, Brad and I bought
this Italianate-style home on historic Somonauk Street in Sycamore,
Illinois. This house was built in 1866 by Dr. Orlando M. Bryan, who was
Sycamore's first doctor. As you will see from the sketch below, many of the original features of the home, such as the cupola and porch, are now missing.

We bought this house on Auction.com without ever having set foot inside.


When we finally did go in, we found the first floor had been divided in to two apartments with a shared kitchen.
 |
| 1st floor - south apartment |
 |
| Closet built to cover original hallway |
 |
| 1st floor - north apartment |
 |
| 1st floor - north apartment (reverse) |
 |
| North apartment bedroom during demo |
 |
| North apartment bathroom during demo |
 |
| 1st floor common area |
 |
| 1st floor shared kitchen - southwest side |
 |
| Staircase divided 1st floor apartments |
The second floor was divided in half, again in to two apartments.
 |
| Upstairs landing |
 |
| 2nd floor - south apartment |
 |
| 2nd floor - south apartment (reverse) |
 |
| South apartment bedroom |
 |
| South apartment bathroom |
 |
| North apartment bedroom |
 |
| North apartment kitchen |
 |
| North apartment 2nd bedroom |
 |
| North apartment bathroom |
The first task was dismantling the apartments. There were some nice original features hiding under layers of paint, the drop ceiling and the carpet.


A demo crew was hired to come in and remove all the lath, plaster, drop ceiling tiles, dry wall, wiring, and insulation.

 We then went in and finished the demo. With some help from Matt, Kurt, Luke, and
Jake, we cleaned up the remaining insulation, removed sanitary and plumbing
lines; ducting, and non-load
bearing walls.
We then went in and finished the demo. With some help from Matt, Kurt, Luke, and
Jake, we cleaned up the remaining insulation, removed sanitary and plumbing
lines; ducting, and non-load
bearing walls.  |
| After cleaning 150 years of dirt in the attic |
 |
| Uncovering original hallway |
 |
| Original hallway uncovered |
 |
| 1st floor - south apartment fireplace |
 |
| 1st floor - south apartment with uncovered fireplace |
 |
| Former south apartment and shared kitchen |
 |
| former north apartment |
 |
| former north apartment |
 |
| 1st floor north - former bedroom & bathroom |
 |
| former common area and north bedroom |
 |
| Former kitchen |
 |
| Upstairs landing |
 |
| Entire 2nd floor north apartment |
 |
| Entire 2nd floor south apartment |


Over time, the floors all sagged in the middle and were very springy. What this meant for us was all other development got put on hold and our focus turned towards the basement. After consulting a Structural Engineer, Ted Carlson at Structural Dynamics, we decided we needed to strengthen our house before we did anything else. This meant cutting out patches of the concrete basement floor, digging out bucket after bucket of dirt, and then refilling the patches with new concrete. By doing this, we made deeper (and stronger) pads on which our newly ordered steel (that’s right, steel) beams now sit.

These vertical post hold up the new horizontal
beams. As I mentioned above, each
existing wood joist (the beams running along the ceiling of the basement, which
support the first floor) were compromised in some way… a notch cut out here for
conduit, a cut there for ducting, etc. Not
to jump ahead of myself, but this was true for the entire house! That meant
that each joist on each floor needed to be “sistered” up with a new wood
joist. This blew Brad’s lumber budget to
shreds.


I digress back to the basement. It all sounds straight forward, but it has
really been quite an undertaking. First,
cutting out the concrete was not easy and carrying out the buckets of dirt was
no fun. Then we called all hands on deck
(thanks to Mike, Jim, Matt, Paul, Joe, Kevin, Kevin, and Tony) to help when the
Regional Concrete truck arrived. Wheelbarrow
after wheelbarrow was filled, transported, and emptied until each new pad was
filled, leveled, and finished.
Next was the temporary placing of the steel beams
and posts. With a lot of help from our
friends Chris and Kevin, the steel beams were hoisted up in to the wall pockets
and temporary wood beams were jacked up underneath to hold their weight.

There was a lot of “troubleshooting” for lack of a better word. The object was to get the first floor level. The problem was, the first floor had not been level in 150 years. After a couple challenges, the former dining room floor was completely removed and the rest of the first floor was as level as it was ever going to be.

There was a lot of “troubleshooting” for lack of a better word. The object was to get the first floor level. The problem was, the first floor had not been level in 150 years. After a couple challenges, the former dining room floor was completely removed and the rest of the first floor was as level as it was ever going to be.

The steel posts were ordered and then put in
place of the temporary wood posts and jacks.

One more beam needed to go in before the posts could be welded to their corresponding beams. This was a 500 pound, 18 foot long beam on the first floor. Its purpose was to hold the weight of the second floor on the northwest side. The post supporting this beam would run all the way up from the basement to the beam on the first floor ceiling…that’s a 16 foot long post!

One more beam needed to go in before the posts could be welded to their corresponding beams. This was a 500 pound, 18 foot long beam on the first floor. Its purpose was to hold the weight of the second floor on the northwest side. The post supporting this beam would run all the way up from the basement to the beam on the first floor ceiling…that’s a 16 foot long post!

Again, all hands on deck for the raising of the
ginormous first floor beam.


Then, it was time for our welder, Carl. He welded the vertical support posts to the horizontal beams.
And that is where we are at now. If you were to walk in to our “home,” you
would think we had not made any progress at all. We've done a lot of “invisible” work. However, this work insures that our house
will stand for another 150 years.
Next up framing….
Subscribe to:
Posts (Atom)