Friday, December 25, 2015

Paint Samples


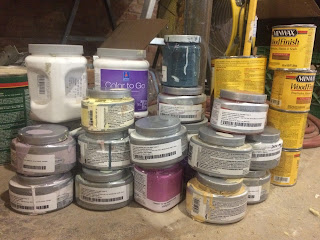
Paint. Paint. Paint.  Ugh!  An important lesson I learned during the renovation of 319 Somonauk Street is that paint samples are a necessity.  While I knew what color I wanted to paint each room (more-or-less), I had a hard time actually getting those colors.  

After buying sample after sample of Sherman Williams samples, which are WAY too big and too expensive, I learned the color of the swatches NEVER matched the color on our walls.  Apparently, it is necessary to use the "suggested" gray primer.  It would have been nice if the sales reps would have told me that!  So, even though our walls were newly primed, they were primed in a beige Sherman William's primer.  

I got so disgusted with Sherman Williams, I ended up having Lowes color match all the S.W. colors in to Valspar paints.  I am happy to say we love all the colors we have chosen.  

Guest room & downstairs bathroom are a sage green

Office is a custom mixed burgundy

Oraya's room is painted to match her quilt
Our master bedroom is a purple-gray


The mudroom is a stormy blue

The master bathroom is a silver-gray

The kitchen is a rusty orange & the living room is a khaki beige


Saturday, October 10, 2015

City Inspection #1

It's been crunch time around here.  We have been putting in late hours at 319 getting it ready for our city inspection.

Electric...done
Plumbing...done (kind of)
Safety measures...done

So, how did it go?  We were given a laundry list of 18 items, ranging for very simple to very silly. There are some plumbing issues on the list and one for the electrician.  Brad has taken care of everything else except for the biggest (and silliest) item.  Well, second silliest.  This one, is by far the silliest (see photo).


Those ducts extending off the house are for the exhaust fan in the bathroom and the drier.  They needed to be extended 36" because they were too close to the windows.  Really?  It's not carbon dioxide for goodness sake, it's poop fumes!

The second silliest item can also be seen in the above photo.  Do you see how the trim was removed to put in the new windows?  And how a couple windows have been closed up?  The weather barrier is visible...and has been for almost three years.  NOW the city has decided the house must be "weather-proofed" with plywood and caulk!  When asked why, they said that we might get complaints about the appearance of the house.  When asked if we had gotten any complaints, the answer was "no."  So, after nearly three years, the city is now worried about the outward appearance of the house.

As you can imagine buying, cutting, and installing plywood around 28 windows and doors will be costly and very time consuming.  Therefore, we are not going to do this item and see what happens during our next inspection.  Pure silliness.

Woodwork & Cabinets

Where should I start?  Mikey, the plumber is working night to finish up our plumbing. KC from Swedberg Electric came through, finishing up the wiring.  Now, Brad and I have ceiling fans and light fixtures to hang...which should be interesting considering every time Brad does electric there is a lot of swearing and it takes quite a large chunk of time.

Don't get me wrong, the man is amazing.   His skilled carpentry work never cease to amaze me.  For example, take a look at the beautiful wainscoting he designed and built.  It is made up of four different layers of wood! Oh, and by the way, he made the stairs as well.


Brad has also built three (That's right, three!) staircases.

Main stairs going in
Main stairs profile
Main stairs done!
Attic Stairs


He also built wainscoting for the underneath side of the attic stairs.


Did I mention Brad also made my tub beautiful and replicated the original panels under all of the windows?

So now, all of the base trim, casing, and doors are painted or stained and installed and look fabulous!  Did I tell you about our base trim?  It was a nightmare!  

The first fiasco with it was when a helper stained the base trim the wrong color.  We then made a poor choice and re-stained it to try to fix the color.  Now, not only was it the wrong color, but it had way too much stain on it.  The mishap that sent us back to square one, though, was this....

Brad took a week off from work to finish trimming the house. At a friend's shop, we had stained, polyed, sanded, and polyed again all of the casing and trim.   This was weeks before Brad was going to need it and it had plenty of time to dry.  About a week before he was going to start installing it all, he stacked it face-to-face and plastic wrapped the ends together.  Then, he transported it back to our house.  When he unwrapped it, it had stuck together and the finish got ruined.  

Our options were to spend $1300 to reorder all new base trim, have a special knife made for a sander and have the stain sanded off, or have it chemically stripped and the lightly sand it all.  We went with the last option...what a pain in the butt! After one set back after another, the base trim was done...finally! 

Just when we thought we were done staining and polying, we ordered and received our newel posts, rails, and spindles for our staircases.  Since I have proved (on multiple occasions) that I am incapable of polying without runs or bristle marks, my job is staining and sanding, and Brad is in charge of polying.  Late one night while staining, I came up with a catchy tune (sung to the (( Bottles of Beer on the Wall" tune)..."99 wood spindles to stain, 99 wood spindles.  Take one down, stain it brown, 98 wood spindles to stain." And when it got REALLY late and this happened (see below) all I could do was laugh...a bit hysterically.  

1 down 98 to go

Domino effect


Since I started writing this post (and didn't post it), the spindles, hand rails, and newel posts have been installed and look beautiful!


In my last post, I talked about the kitchen counter tops, but failed to mention the obvious fact that the cabinets are also installed.  


Friday, July 31, 2015

Countertops!!!


Bar in Dinning Room Before
It was an exciting day at 319 Somonauk.  Today, our counter tops were installed.  Lonnie's Stonecrafters from Rockford did a fabulous job.  We were very pleased with their selection of stone, service, and prices.  I knew I wanted a cream/beige based stone to add warmth to the cold granite.  We went with a stone that incorporated specks of copper and a reddish colors to tie in with the kitchen's copper light fixtures and rusty orange wall color.  The cornices holding up the eating peninsula were a Kane County Flea Market find.

Bar  in Dinning Room After


Eating Peninsula Before

Eating Peninsula After

Kitchen Cabinets Before

Kitchen Cabinets After

Now that the counters have been installed, Brad is taking the next two weeks off (whoowhooooo!) to finish trimming downstairs.  Hopefully, we can also get our plumber back to hook up the kitchen sink and downstairs bathroom plumbing.  We're also waiting to hear back from one of our painters to see when his crew can come and spray our upstairs trim and doors.  I'll keep you posted!

Monday, July 27, 2015

Light at the end of the tunnel

Did you know that a good blogger posts something every day?  Obviously, I am NOT a good blogger. Part of the reason why I am not a true blogger is because many, many, many (and so on), days there is no progress at 319 Somonauk.  The other reason?  I didn't really think anyone was reading this blog.  Lately, however, people have been telling me that they love my blog!  Hmm, imagine that!  I'm not alone in cyber space!  So, for all of you who have been following our progress, I thank you and I have many updates.

Uncovering entry flooring

Last you left me, I was disenchanted with our flooring guys.  I'm happy to say, they removed the flooring that was laid in the wrong direction and reinstalled it going the correct direction.  They also repaired some of the terribly measured/cut boards. Below is the progression of the entry hallway.

New floor laid the WRONG direction
New floor laid in correct direction


New floor with 2 coats of poly...1 more to go!

Living room sanded and unfinished

Living room two coats of polyurethane


Office sanded and unfinished
Office two coats of poly

Only the east side of the downstairs has the original antique floors.  The downstairs west side is all new hickory, which Brad and I laid with some help here and there from our saviors Kevin Reynolds and Kurt Vavra.  We debated the qualities of many species of wood, but in the end, we thought the hickory's color variation would blend well with the many colors of our antique floors.  Even though this was a new process for Brad and I, his perfectionist nature took over and he made sure nearly every board fit to perfection.  It looks great and we are very happy with our choice of wood.


Sticking with the hardwood, take a look at the upstairs hallway, also with new hickory.


Since we're talking about flooring, I should mention the tile work has been done for sometime now.  Our tile girl (that's right, I said GIRL) was great!  Sadly, all the rooms that are tiled are quite a mess, so we don't have photos yet that do the rooms justice.  I'll show you what we have, remember to concentrate on the tile, not the mess.

By using marble and a Greek Key accent, the master bath reflects not only my Greek heritage, but also is time period appropriate.  The ancient Greeks would have visited a bath house or hot springs, we made it a bit easier with a whirlpool tub and steam shower.

Newly framed shower and tub deck

Tub installed and Kurdi board down

Waterproofing up

Show floor installed

Tub deck and surround done

Floor heat first
Carrara marble and specially cut border tiles

Finished!
Not to be outdone by her parents, Oraya's bathroom needed to be equally impressive.  Her's is the most traditional room in our house.  The bathroom is lined with black and white subway tile.  The floor is adorned with black and white hexagon tiles.  


Brad's sister-in-law's mom gave us her old claw foot tub, which we have restored.  Instead of repainting in solid white, we went with a white interior (nicely resurfaced by Resurface Pros) and a black exterior with silver feet.

Original tub sanded...I'm nervous about tackling this DIY

One coat of black...now I'm really nervous 

Two coats of black,,,wheeeew!
The final bathroom is downstairs.  For the shower, we again incorporated subway tiles (as they are time-period appropriate), but went with the more contemporary look of  beige marble.  These tiles share space with chocolate brown larger wall tiles and bull nose pieces.  Instead of a built in nook, we opted for matching brown marble corner shelves.  
Beige subway tiles and Brown 12x12s


 Finally, the floor is a large format beige ceramic. Ironically, the cheapest tile in the whole house, but the only one that was subtle enough to balance the light beige and dark chocolate marble. 


Beige 18x18 floor tile


The last of the tile work was in the mudroom.  To no avail, I searched high and low, near and far for a slate lookalike.  I wanted the look of slate but I did not want the brittleness and the roughness.  After seeing a picture in a magazine, I also wanted a paver size tile in a herringbone pattern.  Darn media!  Always makes us want something we can't have!  I did however, come pretty darn close.  Instead of the subtle color variation that slate gives, we have a more shimmery-charcoal color and I'm completely happy with it!


Alright, now I know why a good blogger posts something everyday...'cause if you don't, you end up with WAY too much to say and you're up until WAY too late typing like mad.  I had intended to update you on all the progress at 319 Somonauk, but for tonight, just the flooring will have to be enough.  

Until next time, thanks for following our progress!